I like to keep track of things. I want to keep track of my farming processes. So here I blog about my process for "flipping" a bed--taking a bed that's finished with its previous crop and preparing it for the next crop.
Have I mentioned my new broadfork? A broadfork is a bigger, freaky, acrobatic version of a regular digging fork. I want to dig deeper and better. but still dig mostly with hand tools, so I decided to try the People's Broadfork from Meadow Creatures, which is supposed to loosen the soil to a depth of twelve inches. The cool thing about a broadfork is that you don't push it down with your knees like a regular garden fork or like a shovel. Instead, you climb on top of it, using your weight, rather than your muscles, to push the thing into the ground. See the woman in the picture on the Meadow Creatures site? Like that. My knees have expressed a rather firm "Don't push me," attitude lately, so I like the idea of putting less load on them.
(And, no, Meadow Creatures did not pay me with chicken wings or perfume samples or garden equipment or anything else to mention them. I just like the fork.)
(And, no, Meadow Creatures did not pay me with chicken wings or perfume samples or garden equipment or anything else to mention them. I just like the fork.)
So. Earlier this year, I grew peas in two beds. They finished off sometime in midsummer, and I got around to snipping the plants off at ground level (the ones that didn't just break off) in...August? The idea of snipping rather than yanking was to leave their roots in the soil to decay and add organic matter. No, I have no idea whether this is actually a valid strategy.
My bed-flipping steps were:
I yanked the ground staples that were securing the weed cloth over the two beds, uncovering a four foot by twelve foot strip of dirt.
I broadforked the two beds. This took me about fifteen minutes, which is far less time and effort than it would have taken to dig the beds much more shallowly with a shovel. The photo below shows the halfway point--the left-hand side is forked; the right is still fairly compacted soil.
Below is the bed fully forked, with the broadfork triumphantly posing.
The broadfork leaves pretty big clods. as you can see in the photo. Or at least, it leaves pretty big clods the way I use it--I may just have bad broadfork technique. A shovel would do the same. A regular garden fork would break the soil up finer. I'm debating how I feel about this. If I needed a really fine seedbed, I guess I could fork and then shallow-till with the electric tiller. But the below are my usual steps.
I sprinkled organic fertilizer over the whole space, using an amount at the high end of the cups-per-square-foot on the bag. I feel as if I should be composting or collecting herbivore manure or applying rock dust that will provide nutrients for years and/or brilliantly cover-cropping for fertility. But for now--bagged organic fertilizer. And sometimes rock phosphate. And I'm trying to find a reliable source of greensand.
And what about compost, you might ask? Well, I've been reading that I should perhaps minimize compost additions to avoid the threat of symphlans, and this bed got a generous dose of bagged organic compost before the peas. So no compost this round. These beds will probably get some when I refresh them again, maybe in late spring.
And what about compost, you might ask? Well, I've been reading that I should perhaps minimize compost additions to avoid the threat of symphlans, and this bed got a generous dose of bagged organic compost before the peas. So no compost this round. These beds will probably get some when I refresh them again, maybe in late spring.
Then I broke up the big clods, by abusing my smaller hula hoe. You can see the job two-thirds done below. This is absolutely not what the hula hoe is made for, but it's by far my favorite tool for breaking up soil. I would be doing this if I had dug with a shovel or a conventional fork, too.
Then I manicured the bed. That is, I got down on my knees (Oof. Ow.) and ran my hands over the soil, squishing clods and smoothing it all out for a fairly even surface.
Then I hooked up the watering. The plan is to run three drills down each bed, so I plugged three lengths of mini soaker hose into the watering spine, each of them twelve feet long plus maneuvering slack.
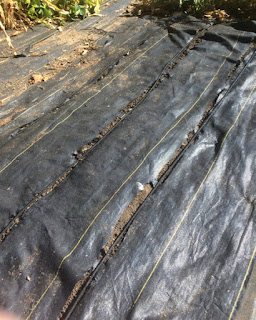
Next, I re-covered the bed with the weed cloth, and cut slits for drills where the cloth previously had holes. Most of the ground is covered, and I can plant in the drills at whatever "spacing in the row" that I'd like to use.
Then I arranged the mini-soaker along the drills, and turned in the water for a leak test.
And it's done! Ready to plant.
Other Images: Mine.


No comments:
Post a Comment