Showing posts with label Sewing Diary. Show all posts

Tuesday, January 21, 2014

Sewing Diary: Red Frankentop (In Work)


Project Category: Wearable Muslin
Garment: Red Frankentop
Fabric: Lightweight red cotton print.
Pattern: Burda 7429. Sort of.

I packed away the drop-shouldered high-collared blouse pattern that I was whining about in the previous post. But then I started to think about it. In the pattern photos and drawings, the bodice and sleeves looked as if they might be a nice, comfortable, but not excessively shapeless core for a blouse. And there's no law that says that I have to keep that high collar. Or any collar.

So I pulled it back out again and started Frankenpatterning it. I started with View B and:
  • Added a little width to the waist and a lot to the hips, by sketching out from the original lines. I spent a while fussing with when to curve and when to straighten out; I need to hunt for some rules on this, for next time.
  • Eliminated the collar entirely and, with the help of some Web tutorials, redrew the neckline to be a fraction wider and a lot deeper, in...er...a keystone shape? You can see it above, where I have the muslin on the hanger over a black tee to highlight the neckline. I haven't yet drafted the associated facing pattern.
  • Changed the curved hemline to a straight one.
  • Eliminated the front band and then, when I realized that the new neckline allows me to just pull the whole thing over my head, the entire front opening--the front is now cut on the fold. The back always was. This is the point where I recategorized it from "blouse" to "top". Blouses open. Tops pull over. That's my terminology.
  • Eliminated the center pleat in the back.
  • Realized that in adding width and straightening the hemline I had somehow ended up with a front that was a full two inches longer than the back. Added the two inches to the back. Puzzled over how on earth that happened.
  • Theorized that that the removed back pleat, by releasing along the middle of the back, was perhaps intended to provide Stealth Bust Room. Considered whether it would be reasonable to make up for that lost shaping by adding inverted pleats in the front that start at the hem and release just below the bust line, and then realized that View A had exactly that. Oh. So I added them--well, in the physical muslin itself; I have yet to draw them on the pattern. 
  • Realized that the bust pleats, by going all the way down to the hem, were (of course) stealing hip room, and changed them to release above and below the waist.
  • Extended the hemline by two inches on a dead straight line so that I can (hopefully) easily do a nice deep perhaps-interfaced hem.
Still on this pattern's agenda:
  • Drawing those front pleats on the pattern.
  • Whether to replace that waistline pleat with a...er...you know, a diamond-shaped dart that releases above and below. A double-pointed dart?
  • Whether to replace the pleat that I removed from the back with two pleats at the back, stitched down from the shoulders all the way down and releasing where the front waistband pleats release, to echo the same shaping front and back. Because when I stand sideways the front looks pretty good, and the back looks skimpy. Of course, if I do the dart in front, there goes the echo.
  • Extending the sleeves by two inches, too, for a hem, eliminating the cuffs
  • I'll probably trace another copy of the sleeve, to make three-quarter-length sleeves as an option.
  • Whether a two-inch facing will have a cleaner edge than a two-inch hem, and whether it's worth the trouble if it does.
Whatever I do with darts and pleats, the pattern is much simpler now. No opening. No collar. No cuffs. If I really do like it and wear it, it could be a good subject for experimentation--binding, facing, piping, and so on. The front pleats also give it some flexibility in terms of wearing ease--I can make them deeper for less ease with heavier fabrics and shallower, or removed altogether, for lighter fabrics. In theory.

I think I'm pleased, but I can't be sure until I make a full-fledged wearable version. That may be this one, with a recut back, or I may move on to a third muslin. (The first one, in a heavier green fabric, didn't survive for a photo.)

Image: Mine.

Saturday, January 11, 2014

Sewing Diary: Windowpane Check Pajama Shorts


Project Category: Indoor garment (This category includes all non-street-clothes, like pajamas, cooking coats, aprons, blah.)
Garment: Pajama shorts
Fabric: White linen (or cotton?) with a blue windowpane check.
Pattern: Butterick 3034 pajama and nightshirt pattern.

It's a new year. I'm going to try to post each completed sewing project this year. We'll see how that works out. There's not much to say about these actual garments--dead simple pajama shorts. But that never stops me from babbling.

For example, I've had the above pattern for a long time. I bought it new, and I see that it's being sold as vintage from 1983, which would mean that I may have gotten it during my first year of college.

It's the rare old pattern in my stash that's actually been used--every time I resume sewing, I seem to make something from it. I made a pajama top and shorts for Himself from it in a nice sorta-quilted sorta-denim fabric, years and years ago. (Though not quite as long ago as I thought, because I remember now that I embroidered it with my Viking Rose, which I still think of, decades later, as "new".) A top for me in a sizzlingly gaudy green cotton print, a bit more recently. A pair of chicken-print pants, even more recently, featured in the "foot" shot in this post. They're all in at least occasional use. And I would swear that there's a pair with a gaudy pattern of concentric circles, lying around somewhere.

All those years ago, to keep the pattern from ripping, I glued the tissue to some sort of plasticized white paper with rubber cement. More recently I re-traced the pants as shorts on Swedish tracing paper, I guess to avoid folding them up. The pattern now requires its own gallon Ziploc to hold all the pieces--and I lost the instruction sheet. Oops. That's going to make it hard to make the top again, with its neck facing and weird halfway-down button placket.

But pajama shorts are easy enough to build without an instruction sheet.

This time, I didn't use a gaudy print, but instead a quietly tasteful windowpane check that was originally intended for a nice tailored shirt. But (1) the intended tailored shirt pattern has been demoted from its Tried-N-True pattern status due to an unreliable lapel, and (2) that windowpane check started to look, to me, like something that should be matched. I don't match stripes. I just don't. I will someday. Really. But "someday" is distant.

So on one of those "Oh, my God, look at the size of my stash!" days, I grabbed it and cut it into pajama shorts before I lost my nerve. I cut two pairs, one on grain and one on the cross-grain. I was curious to know if the two behaved differently, but I lost track of which was which. I was pleased, though, to end up with no scraps worth saving, at least for anyone but a quilter. I refuse to become a quilter. It's not compatible with hoarder genes. Or, really, it's too compatible. That's the danger.

OK, that's a lot of rambling. I cut the shorts. I did most of the sewing with the serger, with the five-thread safety stitch, with the knife on. I learned that I'm not ready to sew with the knife on for precise patterns--my seam allowances get a little tipsy. But for pajamas, it was just fine. I finished all the hem edges with the serger, too; the only part done with the regular sewing machine was sewing down the hem after I turned it just once instead of fussing with turning it and then turning it again.

I love the serger. Love. Adore. How did I sew without it? Finishing raw edges was my very least favorite part of sewing, and the serger fixes that all up.

Oh, and this is the first pair of pants that I ever made without even momentarily mis-sewing them as one big leg. I suppose the permanence of the serger knife motivated me.

Pajamas. Comfy. Yay. However, they don't photograph all that well if you're not willing to model them. They were unhappy about the lack of excitement in their folded-in-the drawer snapshot, so I went with them folded over the tub. Pajamas are all about bubble baths, after all, right?

That is all.

Images: Mine.

Tuesday, February 12, 2013

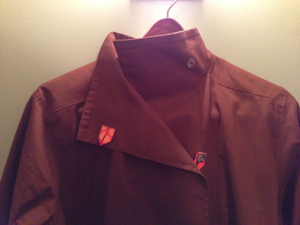
Sewing Diary: Brown Twill Cooking Coat

Project Category: Wearable muslin
Garment: Cooking coat
Fabric: Cheap brown cotton twill, probably from Fabric.com.
Pattern: Sewing Workshop San Diego Jacket

I'm under the illusion that I'm going to start logging my sewing projects in a standard format. I make resolutions like this a lot, and then I end up with a one-post series. But that's not stopping me. Whee!

I've been doing more cooking. And wearing more home-sewn clothes. These are un-mixy things, as Buffy would say, because I don't want fried chicken spatters on my painstakingly constructed linen shirts. My solution is painstakingly constructed cooking coats. I've already made one cooking coat, the goth daffodil coat from the Sewing Workshop Liberty Shirt pattern, but it wasn't altogether satisfactory. The neck isn't high enough to reliably cover everything underneath and, more important, it isn't big enough to easily cover another garment.

The solution seemed to be a jacket pattern. Sandi at Fabric of Vision was wearing a lovely jacket a week or six ago, made from the Sewing Workshop San Diego Jacket pattern--pattern picture above. I decided that I wanted to master that pattern, and realized almost immediately that the first try, the wearable muslin, would work beautifully as a cooking coat as well as a jacket. Roomy jacket, high collar, what more could I want? I had a big hunk of chocolate-brown cotton twill hanging around unemployed, so that was drafted. I didn't preshrink. Bad Martha.

I traced the pattern onto Swedish tracing paper, without alterations--I just traced the largest size. I would normally have checked and altered the hip circumference, but decided that if the pattern doesn't work over my hips, I'd just add a gusset or somesuch thing this time and do that alteration the second time around, probably along with tracing a smaller size for the shoulders. It would have been sensible to make the first cut at these alterations the first time, but, well, I'm lazy and exact fit isn't all that critical for cooking.

The jacket is finished, and I'm happy with it. I'm wearing it as I lounge on the couch, trying it out for comfort. (OK, and then I took it off for photos, complete with the wrinkles resulting from the lounging.)

Random comments on the pattern:

  • The largest size had enough room for my alarmingly large hips--though not an excess of room. No gusset needed.
  • The assembly was not remotely intuitive, but the pattern instructions and pictures took care of that just fine.
  • The sleeves go in on the flat, but more easing was required than I'm used to for in-the-flat sleeve installation.
  • The armholes hang well beyond my shoulder, not surprisingly given my choice to use the largest size. But the sleeve is flat enough and roomy enough that it's perfectly comfortable that way; there's none of that armhole-in-the-wrong-place constriction. I should alter to a smaller size at the shoulders, but for appearance, not comfort.
  • The seam between the odd facing/collar piece and the back of the back neck required a lot of easing. The pattern warns you to reinforce and to clip, but I had to clip and strain the short piece to within an inch of its life, and still ended up making a quarter-inch fold in the long piece at the back of the neck, to make half an inch go away. If I'd altered the pattern I would have assumed that I made a mistake, but I didn't alter. This is probably partly the un-stretchy twill and partly my limited skill; I'm hoping that in, say, a nice soft wool these pieces would ease together just fine.
  • I'm not sure if the button loops are worth the trouble. Of course, I didn't go to the full trouble - you're supposed to make a strip from the main fabric and fold it for loops; I used a piece of nicely gaudy ribbon instead.
  • It's really comfy. I can imagine making a few in that nice soft wool, lightweight for sweater-like warmth without the Stay Puft Marshmallow feeling of wearing a woolly sweater.
  • It covers a shirt and heavy sweater, and has a wonderfully high collar, so it will do the job of protecting my clothes against frying poultry.
  • The pattern doesn't call for topstitching. I topstitched it to death because I don't want to press a cooking jacket - I want the seams to lie where they belong right out of the dryer. I still want that topstitching for a street version, but my topstitching technique is lousy and I still don't have an edgestitching foot, so it's a thicket. 
  • The pattern doesn't call for interfacing. I find myself thinking that the collar/facing piece needs some, especially if I make the jacket out of a lightish fabric.
  • The lines of the jacket are too simple for a simple featureless fabric like the twill. No problem for the cooking coat, but I'll need to keep this in mind.
  • Wow, this thing is comfy.