Monday, September 26, 2016

Patient Garden: A Tale of Two Beds


I like to keep track of things. I want to keep track of my farming processes. So here I blog about my process for "flipping" a bed--taking a bed that's finished with its previous crop and preparing it for the next crop.

Have I mentioned my new broadfork? A broadfork is a bigger, freaky, acrobatic version of a regular digging fork. I want to dig deeper and better. but still dig mostly with hand tools, so I decided to try the People's Broadfork from Meadow Creatures, which is supposed to loosen the soil to a depth of twelve inches. The cool thing about a broadfork is that you don't push it down with your knees like a regular garden fork or like a shovel. Instead, you climb on top of it, using your weight, rather than your muscles, to push the thing into the ground. See the woman in the picture on the Meadow Creatures site? Like that. My knees have expressed a rather firm "Don't push me," attitude lately, so I like the idea of putting less load on them.

(And, no, Meadow Creatures did not pay me with chicken wings or perfume samples or garden equipment or anything else to mention them. I just like the fork.)

So. Earlier this year, I grew peas in two beds. They finished off sometime in midsummer, and I got around to snipping the plants off at ground level (the ones that didn't just break off) in...August? The idea of snipping rather than yanking was to leave their roots in the soil to decay and add organic matter. No, I have no idea whether this is actually a valid strategy.

My bed-flipping steps were:

I yanked the ground staples that were securing the weed cloth over the two beds, uncovering a four foot by twelve foot strip of dirt.

I broadforked the two beds. This took me about fifteen minutes, which is far less time and effort than it would have taken to dig the beds much more shallowly with a shovel. The photo below shows the halfway point--the left-hand side is forked; the right is still fairly compacted soil.


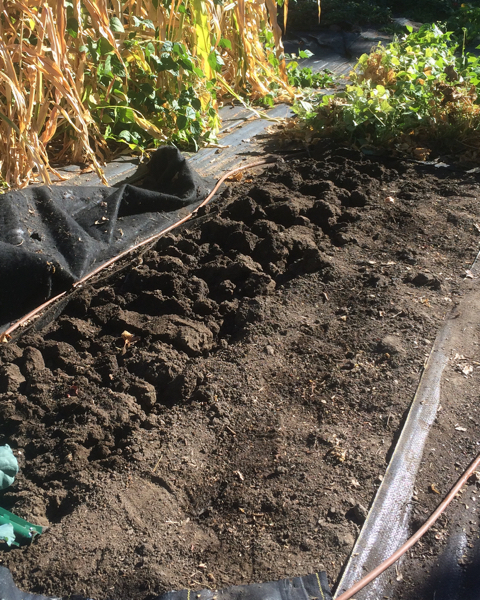
Below is the bed fully forked, with the broadfork triumphantly posing. 

The broadfork leaves pretty big clods. as you can see in the photo. Or at least, it leaves pretty big clods the way I use it--I may just have bad broadfork technique. A shovel would do the same. A regular garden fork would break the soil up finer. I'm debating how I feel about this. If I needed a really fine seedbed, I guess I could fork and then shallow-till with the electric tiller. But the below are my usual steps.


I sprinkled organic fertilizer over the whole space, using an amount at the high end of the cups-per-square-foot on the bag. I feel as if I should be composting or collecting herbivore manure or applying rock dust that will provide nutrients for years and/or brilliantly cover-cropping for fertility. But for now--bagged organic fertilizer. And sometimes rock phosphate. And I'm trying to find a reliable source of greensand.

And what about compost, you might ask? Well, I've been reading that I should perhaps minimize compost additions to avoid the threat of symphlans, and this bed got a generous dose of bagged organic compost before the peas. So no compost this round. These beds will probably get some when I refresh them again, maybe in late spring.

Then I broke up the big clods, by abusing my smaller hula hoe. You can see the job two-thirds done below. This is absolutely not what the hula hoe is made for, but it's by far my favorite tool for breaking up soil. I would be doing this if I had dug with a shovel or a conventional fork, too.


Then I manicured the bed. That is, I got down on my knees (Oof. Ow.) and ran my hands over the soil, squishing clods and smoothing it all out for a fairly even surface. 


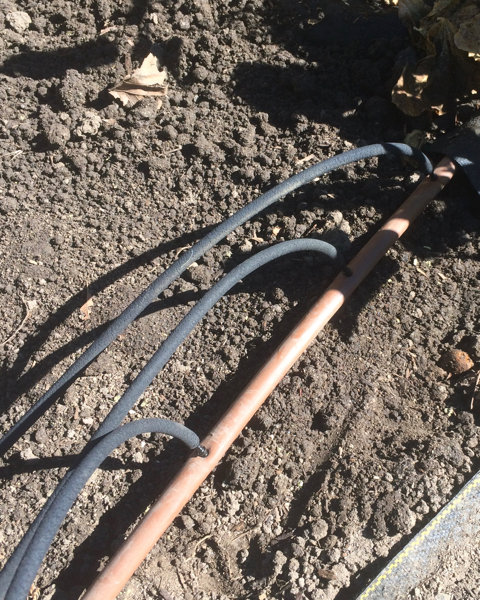
Then I hooked up the watering.  The plan is to run three drills down each bed, so I plugged three lengths of mini soaker hose into the watering spine, each of them twelve feet long plus maneuvering slack.


Next, I re-covered the bed with the weed cloth, and cut slits for drills where the cloth previously had holes. Most of the ground is covered, and I can plant in the drills at whatever "spacing in the row" that I'd like to use.


Then I arranged the mini-soaker along the drills, and turned in the water for a leak test.


And it's done! Ready to plant. 


Other Images: Mine.

Sunday, September 25, 2016

Harvest: Parch Corn!

I grew parch corn!

You're not excited enough.

I GREW PARCH CORN!

Are you excited yet? I can get louder.

Specifically, Supai Red parch corn. This is my second time trying to grow it, and many years of wanting to try it.

Now, I haven't technically "tried" it yet, because I haven't parched any. I tried and failed. I think it needs to dry a while longer.

What is parching, you may ask? I'm not actually sure; my understanding is that it's something almost, but not entirely, unlike popcorn. Or sort of like puffed rice You heat it and it "poofs." I think.


It's beautiful, isn't it? I was hoping for a couple of ears, but instead I got about forty. So, yay!


If it never parches, it's still flour corn. Apparently all parch corn is flour corn. (But not all flour corn is parch corn.) So I'll find a way to grind it.

Anyway, yay!

That is all.

Images: Mine.

Wednesday, September 21, 2016

Patient Garden: Potatoes


Potatoes.

Potatoes are the subsistence food, but they're also jolly. After the zombie apocalypse, we'll all be munching on French fries.

The problem with growing potatoes is the dirt. Now, everything grows in dirt, but for most crops, you  pretty up the dirt with fertilizer and compost and stuff, you pat it all down all nice and neat, you insert the seeds and/or plants, and then you're done with the dirt. Well, at least I'm done with the dirt, because I do that weed barrier thing.

Potatoes involve a lot of dirt encounters. First there's the normal soil prep, with an extra priority on that loose, friable soil thing. Then you're likely to dig a trench to plant the potatoes in. Then the potatoes come up and you bury their stems once, twice, maybe three or four times. By the end the trench has been filled and the bed is now likely mounded up to a hill. Dirt, dirt, dirt.

All that soft friable dirt stuff attracts (1) weeds and (2) cats seeking a warm sunny litterbox. I disapprove of both. In my single bed of potatoes last year I thwarted the cats with a layer of floating row cover. That didn't do a thing against the weeds (in fact, it probably encouraged them) and it also added heat to potatoes already coping with a too-warm spring. So that's not a plan.

After a fair bit of dithering and sketching, I dreamed up a scheme that involves cheap three-foot weed barrier or maybe paper row cover, Crystal Geyser one-gallon square jugs with the bottoms cut out, and, well, potatoes. I may blog a sketch later. Or photos even later. Details aside, the plan lets me cover most of the potato soil against the weeds and cats.

This method isn't "patient", because it requires that I show up at a fairly specific time to do the first hilling, but I'm trying to make that as easy as possible by digging the smallest possible trenchlike hole for each potato, thus requiring the smallest possible amount of soil for filling in--maybe little enough that I could ask a friend to do the first hilling if I'm going to be out of town. The second hilling will be much more work, but if the original hole is fairly nice and deep, it will be moderately optional.

All of this ignores the cost of inputs. In addition to compost and fertilizer, I'll need four feet of weed barrier and one Crystal Geyser jug per plant. (And, yes, I am getting the MacGyver vibe. I'm just ignoring it.) I want the cost of all that (admittedly, I guess I'm going to drink the water) to be lower than the value of the potatoes.

Though I'm going to do it either way, at least one year. Got to be prepared for the zombies.

Image: Wikimedia Commons.

Tuesday, September 20, 2016

Blogging: Patient Garden and that...thing


That thing. That thing. What do I mean?

See, the phrase "patient garden" means what I want it to mean--at least it to me. But when I say it so often it still has a sort of BrightHappy catchphrase feel. Maybe the BrightHappyness is the thing. See that picture? Bright and happy and scary as all get-out, right?

And the blog, for, oh, a whole two weeks or so, actually seems to have a (gulp) topic. It's (slightly) less diary-like and more information-like. It's not flitting around like a drunken flour moth. And that feels...weird. Kinda weird. Maybe the problem is that if I keep that up, I'm in danger of eventually taking it seriously? Maybe the seriously is the thing.

Because, see, I would love to reach the point where I could say, "So you want to have a vegetable garden in spite of being able to tend it only at irregular and unpredictable intervals? Here. Here is The Truth of how to accomplish that." Of course, The Truth isn't achievable, but a nice bag of well-organized advice is theoretically possible. Eventually. Where eventually is several growing seasons from now.

So I feel weird about the blog lately. That's all I wanted to say. I think that I needed to say that, in order to keep on doing the Patient Garden posts. Because I wanna do them. For some reason. Not knowing the reason might also be the thing.

OK. That's said. More vegetable discussion will commence.

Image: Wikimedia Commons

Monday, September 19, 2016

Patient Garden: Next Year

I'm planning next year's crops. Really, I'm always planning next year's crops.

Right now, I'm plotting to increase the space devoted to crops that fit two categories:

(1) Crops that are flexible about harvest time, that store for a long time, that I will actually eat. For me, this category is dominated by alliums. Garlic, shallots, potato onions, bulb onions (both overwintering and main-season.) All the oniony things that dry down into nice storable roots. But if the parch corn and the Candystick delicatas are a success this year, they will also be in this category. Potatoes would be in this category if I could solve the problem of weeding. I have a tentative scheme for that that I may post about sometime.

(2) Impatient quick-growing crops that I will eat. This is mainly lettuce and various greens grown for baby leaves, but may also include radishes, baby beets, and...well, probably other things. While there's always a risk that I won't catch these at the right time to eat them, their quick-growing nature limits the loss if a gamble fails.

I'm trying to grow less of:

(3) Long-season crops that are impatient about harvest. Tomatoes, summer squash and zucchini, sweet corn, snap beans, peppers, eggplant, cucumbers, and any number of others take a good long time to produce, and if you're not there to eat the product, you've wasted that ground for that season. 

We will be growing some crops in category 3, because we love snap beans and Armenian cucumbers and it's hard to imagine growing a big garden and not having any tomatoes. So I'll try to grow the least impatient cultivars. 

Armenian cucumbers are already pretty good--they seem to bounce back nicely after oversized fruits have been removed. Last year's dryfarmed Early Girls held for a very long time on the plant, and another very long time in the house. I've read that Fortex beans have a pretty long edible period, from tiny strings to long long beans.

(I feel as if I've already written most of that last paragraph. But I don't see that I've posted it. Hmm.)

So the category 3 crops will probably consist of:
  • Two fairly conventionally grown beds of tomatoes, each with one Early Girl and one Sungold, in tomato cages that I hope might hold them up a little. The two beds will be as far apart as I can reasonably get them, on the theory that if one of them catches something the other one won't. I'll plant them dryfarm style, but I'll water them unless next year is an extra droughty year.
  • Blue Lake bush beans by the left-hand fence. The fence gets shady earlier than some parts of the garden, but I've found that beans seem to embrace just a little shade. And last year's beans didn't get as much water as they wanted, and I don't want to give them much more, so the shade might close that gap.
  • Fortex beans, also by that fence. I'm going to pound in some rebar near the other side of their bed and string something--strings? Netting? Wire? Chicken wire?--across, to support the beans.
  • Blue Lake pole beans, supported like the Fortex.
  • Two beds of Armenian cucumbers, each with two plants. Even when the plants are in temporary shutdown due to oversized fruits, four plants will likely give me plenty of cucumbers. Of course, when they're not in shutdown, four plants will give me enough cucumbers to feed the town. So. Hm.
Um. That seems to be all.

Thursday, September 15, 2016

Patient Garden: Crops That Go Poof


So, there was that scene in Buffy, where Buffy killed a demon, and they were all standing around looking at its body, and Willow said, "Isn't he gonna go poof?" But, no, unlike the vampires, the demon failed to collapse into easy no-muss-no-explanations dust, and they had to drag him off to bury him.

Yes, it's relevant. Give me a sec.

Some garden crops don't get harvested. It's just the way it is. The spare zucchini, cucumbers, big tomatoes during tomato glut, that sort of thing. They don't get harvested, and then they just sit there on the plant slowly getting soft, and eventually getting all disgusting and furry or winey or vinegary, or they exude the "what died?" odor of a sidewalk covered in decaying figs. These crops are impatient in a particularly unpleasant way.

But some unharvested crops aren't like that. Instead, they go poof. This is a relatively good thing. While of course it would be nicer for all crops to wait patiently in prime condition until the gardener gets around to them, poof is much better than furry.

What, precisely, do I mean by poof? Well, consider Sungold cherry tomatoes, for example. They sit on the tomato for a while, and when they're done waiting, they fall off. But they don't squelch on the ground and get furry; they just sort of dry down and eventually melt into the soil, causing no more trouble than, say, raisins. The same is generally true of raspberries, blueberries, blackberries, huckleberries, and the like. Actually, huckleberries are so small that I'm not sure what happens to them. It's possible that they dry up and cling to the bush until winter, the way that I think currants do. But currants are no trouble either.

My point is that the gardener doesn't actually have to do anything about these crops, aside from feeling vaguely guilty about not having harvested them. Which raises the obvious question: Why grow them if you're not going to eat them? They're still consuming land and water and fertilizer.

The answer is that some crops are so good that they're worth having around even if you only get a fraction of them. Many people would include Sungold tomatoes in that category; I don't know if I would. But I would definitely include most of those berries.

I'd especially include strawberries, though those aren't quite so reliable at going poof. In an under-watered strawberry patch, the strawberries are small (but still delicious) and usually do just dry up and fall off if they sit unclaimed. In a lush thriving patch, the berries are likely to be big enough to at least occasionally go furry.

Anyway. My point is that crops that go poof can be perfectly good average, if not precisely admirable, citizens in a patient garden.

That is all.

Image: Wikimedia Commons

Wednesday, September 14, 2016

Patient Garden Crops: Chard. Fordhook Chard.

I hear it in Sean Connery's voice. I just do.

So, I want to like chard. It's immensely patient. Last year, I bought a six-pack of rainbow chard seedlings and made them wait and wait and wait for me to plant them, until I was sure they were dead. But they forgave me and grew. They kept growing, all year, while I ignored them. Well, I occasionally gave some leaves away, I think, but I didn't eat any myself.

They survived the winter and grew again this spring, while I ignored them. I tried to pull them out and the big roots said, "Yeah, right," in a display of patience that might be more accurately described as stubbornness. Only when the weather turned hot in their second summer did they finally bolt. We cut them down to the nub, and even then, they resprouted salad-quality leaves. Finally, a few weeks ago, I wrestled them out once and for all--I think that the bolting diluted their stubbornness.

A grand success in terms of patience. A complete failure in terms of food. I don't like chard. At least, I don't like big cooked chard leaves.

But friends like it. And I like it fine in restaurant salads.  And the nice man at the food pantry assures me that they'd be happy to take any extra. So I'm going to plant some seeds of Fordhook chard.


Look! Fordhook chard! Pretty! (Image from Territorial, the folks that I ordered the seed from.)

Fordhook is described as having huge leaves, and therefore the very young leaves are also reputed to be extra-large. My theory is that I'll plant it at a fairly narrow spacing and keep it cut for those baby leaves, but when I inevitably let it get out of hand, then I'll just cut it for big leaves and give them away, and wait for the plants to sprout the baby leaves again. The net result would be--if all goes according to plan--salad greens that find summer heat not too upsetting. Patient salad greens.

A plan?

We'll see.

Dig for Plenty Image: Wikimedia Commons.
Chard Image: Territorial Seed Company.

Tuesday, September 13, 2016

(Im)Patient Garden Crops: Lettuce

As previously discussed, garlic waits patiently to be harvested. Lettuce, on the other hand, shrieks "Pick me! Pick me! PICK ME! OK, fine, I'm gonna bolt." But I want salad greens, including lettuce, whenever I want them. Even if I've been away for a month. I am unreasonable and demanding.

So, I start planning.  Googling suggests that in warm weather, lettuce goes from seed to baby leaves in about thirty days, and to a head in another twenty or so days after that. The heads may hold for a week or three. And cut-and-come-again lettuce, again according to Google, usually produces fresh leaves about two weeks after being cut. I do realize that these numbers vary by lettuce variety and temperature. I'm just using them to work with.

So let's say that I'm going away for a month in warm weather, I don't want any lettuce to go to waste, but I want some to eat right before I leave and right after I get back. Let's say that the farm contains recently-planted lettuce seeds, month-old baby plants, and maturing plants of head and leaf lettuce. I leave the seeds alone (or plant seeds, if there aren't any in the ground), leave the babies alone or maybe thin them a bit for the coming month of growth, give any large leaf lettuce plants a haircut, and harvest any mature heads of heading types. That's all probably too much lettuce, so I schedule a morning hour to run the extra by the food bank.

When I come back, the former seeds are now baby leaves, the former babies have been heads or large plants for about a week, and the former large cut-and-come-again plants have sprouted new leaves that are now about two weeks old. Most of that will probably be nicely edible, at least if I've chosen reasonably heat-tolerant lettuce. If the heads have that threatening pointy I'm-gonna-bolt posture, I may again run some by the food bank. And I try to get some new seeds in the ground in the next week or two.

What if I'm coming back in one or two weeks? I do pretty much the same thing, without the thinning. What if the weather is cooler? I only cut the biggest heads, because everything will be growing slowly.

Sounds easy. We'll see if I mock this post next year.

It all means that I need to devote a fair bit of space to lettuce, enough to allow me to have room for seeds, babies, maturing cutting lettuce, and maturing heads, all simultaneously. And since I don't want to have to rush to harvest and prep and seed, I probably want double or triple that number of "spots" so that there will usually be one or two ready for seeding at any given time. So let's say twelve drills, three drills per bed, four beds of lettuce.

That was for warm weather. In the winter, lettuce will grow much more slowly, so those twelve drills, adding up to seventy-two equivalent-row-feet of lettuce, would come in handy if I got them seeded at just the right times--in time to make decent teenage lettuces before it gets cold, lettuces that can then grow slowly and be eaten through the winter. I think. I'm not really at all sure.

I'm looking at the Twin Oaks Lettuce Log from Sustainable Market Farming by Pam Dawling. She grows in zone 7a in Virginia; I grow in zone 7a in Ashland.  Judging from the log of seeding, transplanting, and harvesting times, lettuce planted in late summer for winter lacks the "I'll get to it when I get to it" vibe that I'd like in a patient garden. But I'm hoping that the rest of the year, and the harvest, will be reasonably leisurely.

The late-summer lettuce planted so far this year includes twelve feet of a nice butterhead whose name escapes me, seeded in early August. And six feet of that same butterhead and eighteen feet of Tom Thumb, seeded in late August.

I'll plant another nine or eighteen feet of some sort of leaf lettuce in late September.  I ordered seeds! Seeeeeds! Galiano, Hampton, Italienischer, Merlot, and Mottistone. Reds and greens and speckles, rumply or frizzy or oakleafy. I hope it all works.

That is all.

Image: Wikimedia Commons.

Sunday, September 11, 2016

Patient Garden Crops: Garlic

The ideal patient garden crop is willing to wait several weeks for attention. It doesn't insist that you plant it as soon as the soil is prepped. It doesn't whine at you to thin or prune or stake or spray it with only a few days' notice. Or harvest it in a hurry. Or, for that matter, eat it in a hurry.

Garlic qualifies, on all counts.

I wasn't going to plant garlic this fall. Now I've forgotten why, because, what's the down side? It's a flavoring! It's a vegetable! It's a perfume!

So, I put together a garlic order from Territorial, half a pound each of Duganski, Inchelium Red, Premium Northern White, Susanville, Uzbekistan, and Vietnamese Red. Woohoo!

Oh, now I remember part of why I wasn't going to plant garlic: The weed cloth hole spacing. It seemed ridiculous to plant garlic eighteen inches apart in both directions. But if I cut drills through the cloth, I can plant at six inches in the row, rows eighteen inches apart. That makes for...um...three six-foot drills, twelve plants per drill, thirty-six plants per bed. Looking at the cloves-per-pound on the Territorial site, that works out to be just about half a pound of seed garlic per bed. So, six beds, one for each type, and maybe a seventh mixed bed if the clove count tends high instead of low.

Again, woohoo!

I'm planning to start adjusting the farm watering to allow me to turn the watering on or off for every single bed, with little inline manual valves. (It's probably only a matter of time before I write Patient Garden: Watering.)  That way, I can have the garlic on the watering system when I plant it, shut off its water as soon as the autumn rains start, turn it on again when the rain stops in late spring, and then shut it off when it's time to let the heads start to dry.

The only impatient part of this crop is the scapes--the stalks, with their little hatlike ends--from the hardneck varieties. Garlic-growing instructions suggest that you visit the garlic patch weekly once they start developing, to cut them off--both for eating, and because if they're allowed to keep developing, they'll steal some resources from the bulb.  But if I don't remove the scapes in a timely manner, the garlic will survive.

So, I can prep the soil and set up the drills and watering well before I plant. I can plant and turn on the watering and mostly walk away for months, probably returning once to turn the watering off, and once to turn it on again. I should cut the scapes, but I don't have to. There's a pretty long acceptable period for harvesting--there's an ideal moment, but a little early or a little late is still OK. And then the harvested heads keep for months.

Perfect.

Main Image: Wikimedia Commons.

Saturday, September 10, 2016

Patient Garden: Weeds

I thought I wanted a low maintenance vegetable garden. And I do, but that's not the overriding goal. What I want is a patient vegetable garden. A garden that will wait for me to have time for it--a week, two weeks, a month--without throwing a weedy, tomato-rotting, lettuce-bolting, tantrum. I want the farm (our roughly five thousand square foot vegetable garden) to be patient.

Weeds!

Weeds are impatient. If you turn a bed and come back less than week later, you can clear the cute green weed-fog with a few strokes of your choice of hoe.  And then you need to come back soon to do it again. And again. And again. And again. In theory, fewer weeds re-sprout each time, but testing that theory requires a nice long period of assiduous weed control.

If you miss a few rounds of that game, the weeds keep on growing. Exponentially, I believe. A bed that would have taken less than a minute to weed a month ago is suddenly an afternoon's work, with all the other beds all around it impatiently begging for attention. At that point the gardener is tempted to just abandon the whole thing and wait for next year.

I got tired of that.

Weed cloth?

Heavy-grade weed cloth (every time I buy it, they ask, "You mean 'weed barrier'?") is intended as a permanent solution--you're supposed to staple it down and then cover it with mulch. In fact, failing to cover it voids the warranty. Using it in an annual vegetable garden, where you need to turn and amend the soil frequently, is quite, quite mad. 

We did it anyway.

Weed cloth.

Here I'm going to describe some geography. The farm is approximately a square. It has twelve wide rows, each one six feet center to center and about seventy feet long. The planting area of each row was intended to be four feet wide, with paths two feet wide. The last few feet of  each row is too shady for annual vegetables, so I divide each row (identified by a number) into ten six-foot beds (identified by letters). So, a total of 120 beds (from 1A through 12K), each with a growing area four feet wide and six feet long.  

Last year, we started covering the whole space with "pro" quality weed cloth, and we'll have the last gaps filled by the end of the season this year. We ran three-foot-wide cloth down center of each path, making a striped farm--three foot dirt, three foot cloth, three foot dirt, etc. Then we ran six-foot-wide cloth down the center of the dirt stripes. (At least, that's how we ended up. Actually laying the cloth was less systematic than I make it sound.)

So, the general idea is that I lift the cloth for a bed or beds, work and amend the soil, put the cloth back down again, cut holes in it, plant the plants through the holes, and when that crop is done, repeat the whole process. Simple, right?

Holes bad.

Except, if you cut too many holes too close together, the purpose of the cloth is mostly lost. Lacework isn't much good for weed control. So spacing is an issue. Last year, I started looking for ways to space everything no closer than eighteen inches in both directions, and for many crops that works just fine. Onions can be planted in groups. Bush beans, kale, and so on, make bigger plants with wider spacing, and wide spacing is a part of dryfarming.

But some things, like lettuce, beets, carrots, mache, baby greens, and so on, just don't seem suitable for the wide spacing. It took me until this year to realize that instead of cutting individual holes checkerboard-style, I can cut slits and plant in little rows, I believe called "drills". I effectively get rows eighteen inches apart, that allow any spacing within the row. This also eliminates the problem of trying to spot-water all those little holes; instead, I ran mini soaker hose down the drills. The photo shows baby beets sprouting in the first drill that I planted.

Cuts bad.

Once something is planted through the fabric, I can't lift that fabric.  So if bed 4G is done and ready to be replanted, but beds 4F and 4H are still going strong, I have to cut. Then, to keep weeds from sprouting through the cut, I have to patch with a short length of fabric--usually one foot overlap on each side. I'm doing my best to amend groups of adjacent beds at once, but I suspect that in the long run, almost every bed will be cut on both sides.

Geometry.

Remember how the original "stripes" were three feet of cloth and three feet of dirt, but I said that the growing area was supposed to be four feet? See, when I chose the three-foot cloth, I thought that eighteen inches of overlap was required to foil the wilier weeds. I was wrong. And I didn't know how much of a pain it would be to lift the cloth, so I assumed that lifting the path cloth along with the row cloth would be no big deal. I was wrong again.

So it would have been better to have permanent two-foot path coverings, so that lifting the six-foot cloth would expose a full four feet for amendment. For now, I'm treating the path cloth as permanent, amending the three exposed feet of dirt (exposed, that is, when I lift the six-foot fabric), and planting with spacing that pretends that the un-amended six inches on each side is fully productive soil. I'm deluding myself that the fertilizer will dissolve into it and the earthworms will work it for me--and I'm treating it as bed and not path and making sure I don't step on it. We'll see if I get a visible edge effect that proves me wrong.

And...

The fabric also means that I can't add solid fertilizer during the growing season, so I'm researching organic soluble fertilizers and slow-release fertilizers. And there are some crops, like potatoes and peanuts, that are simply not intended to be covered during the growing season. But...

Weeds!

...it's worth it.

(Edited to add: I forgot the part where the cloth costs money. I hope to amortize the cost across five years, but I can't reliably predict, because I am merrily voiding the warranty. I'll address the cost in a later post about cost of inputs versus value of produce. After I find out whether the terrifying July water bill can be blamed on the farm or the effort to revive an accidentally neglected lawn.)

Image: Wikimedia Commons.